The Shopware glossary: the most important technical terms relating to your online store
Are you new to Shopware and want to finally get started with your Shopware store? Or are you always stumbling over terms that you don't know yet? In our Shopware glossary you will find all the important terms relating to Shopware and the corresponding explanations or instructions. By the way: This glossary is updated regularly! So if you can't find a term yet, please let us know and we will add it immediately. If you have any further questions about Shop ware, we will be happy to help you personally.
Reading time 6 min
- Shopware 6 Demo
- Shopware Store
- Shopware 6 changelog
- Shopware 6 maintenance mode
- Shopware 6 licenses
- Shopware 6 Frontend
- Shopware 6 Backend
- Shopware 6 Updates
- Shopware 6 Themes
- Shopware 6 Cookie Settings
- Shopware 6 Filters
- Shopware customer groups
- Shopware minimum quantity surcharge
- Shopware premium items
- Shopware 6 Cache
- Shopware 6 API
- Shopware dynamic product groups
- Shopware shopping worlds
- Shopware Shopping Experiences
- Shopware guest order
- Shopware 6 Newsletter
- Shopware landing page
- Shopware Topseller
- Shopware 6 Footer
- Shopware delivery time
Shopware 6 Demo
Are you interested in the Shopware store system and would like to take a closer look at its functions? With the Shopware 6 demo you get a good insight into all Shopware areas. You can request the demo store directly from Shopware itself and receive all the important details from an expert in a live presentation. As a prospective store owner, this gives you the opportunity to experience Shopware in action and understand how it can benefit your business.
The demo is offered to you without obligation, so you have the opportunity to try out the store system at your own pace and get to know the various functions. As soon as you have received the access data for the demo store, you can log in directly and explore the user interface. This gives you the chance to experience the intuitive operation of Shopware and explore the options for customizing it to your individual requirements.
During the live presentation, you can ask questions and receive customized answers from an expert who will explain all the important aspects of the system. This will allow you to develop a better understanding of how Shopware works and how it can help your business succeed.
If you need additional support or would like an initial demo, you are also welcome to contact us. As experienced Shopware experts, we will be happy to give you a comprehensive insight into the world of Shopware and show you how the system can be used successfully for your business. We offer you personal advice and help you to find the right solutions for your specific requirements.
Don't hesitate to try out the Shopware 6 demo or contact us for more information. We look forward to helping you get started in the Shopware world and supporting you on your way to a successful online store
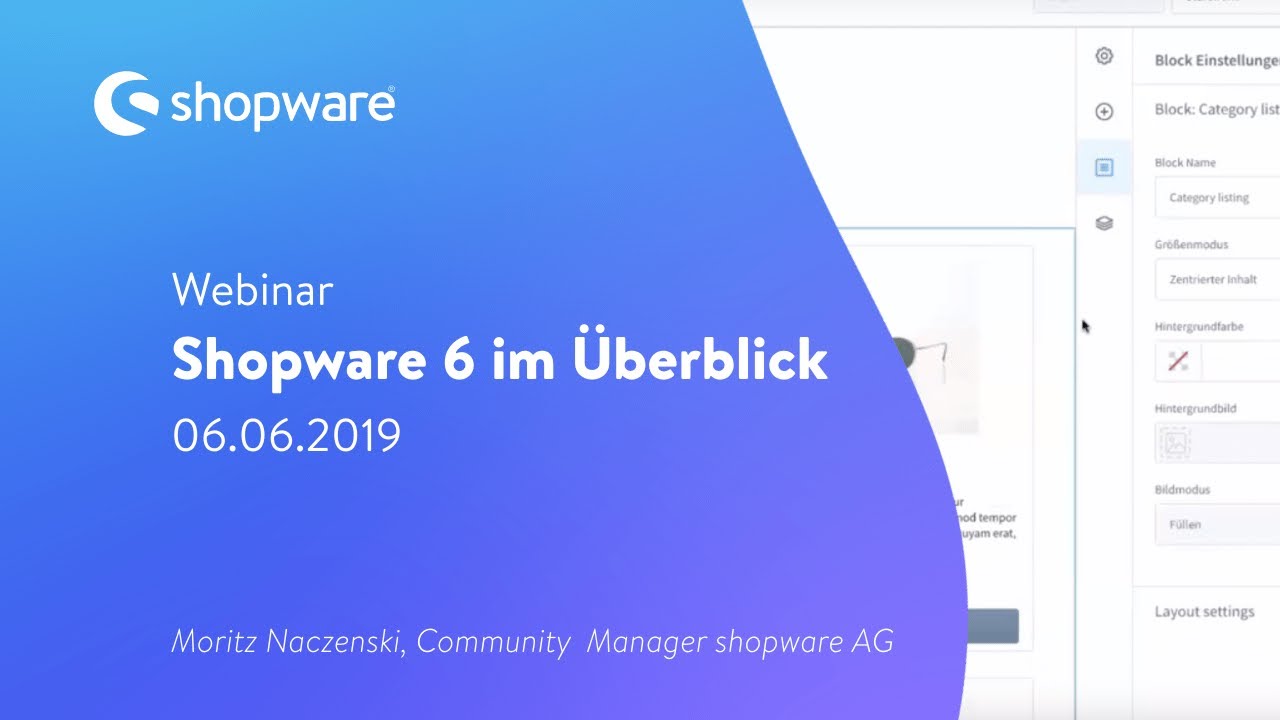
In this video you will also get a good insight into Shopware 6 and the administration of the store:
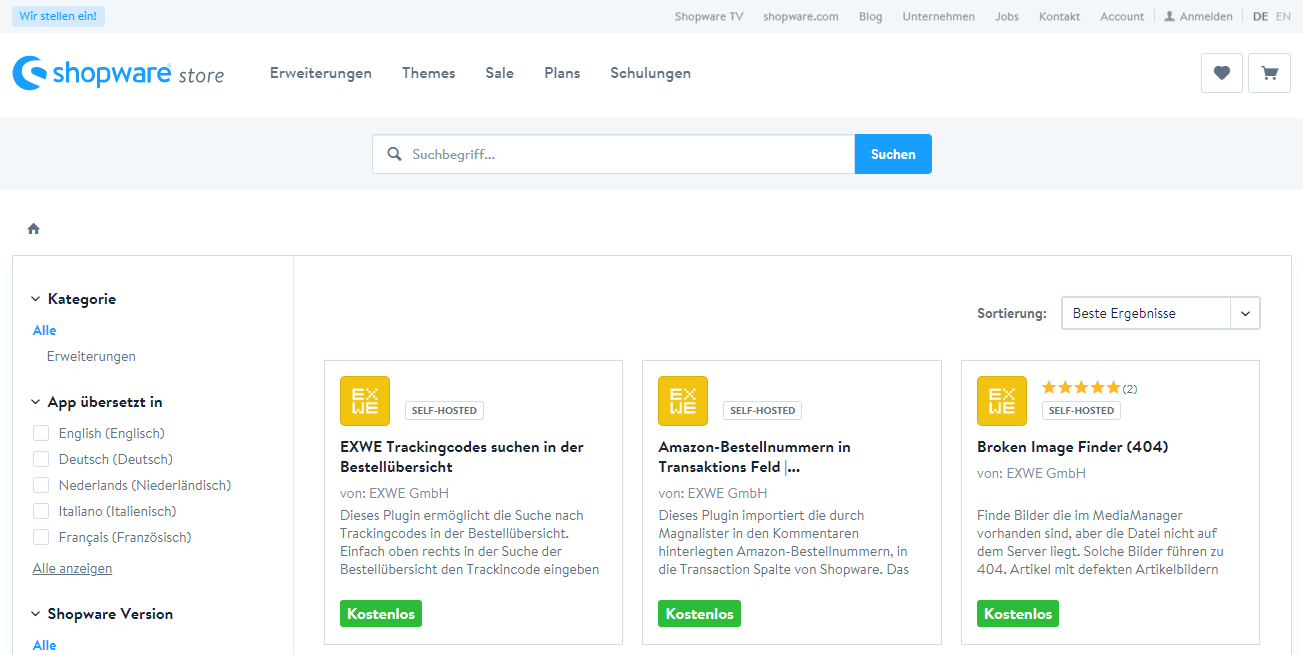
Shopware Store
If you run a Shopware online store, you can add many more functions to your store. You can find many extensions and plugins in the Shopware Store. In principle, there is almost nothing you can't do with your store if you install the right plugins. In your self-hosted store, you can find all the plugins and extensions that you have already installed and purchased under "Extensions" and "My extensions". You can also find all themes and upload new extensions there.
You can find the Shopware Store here.
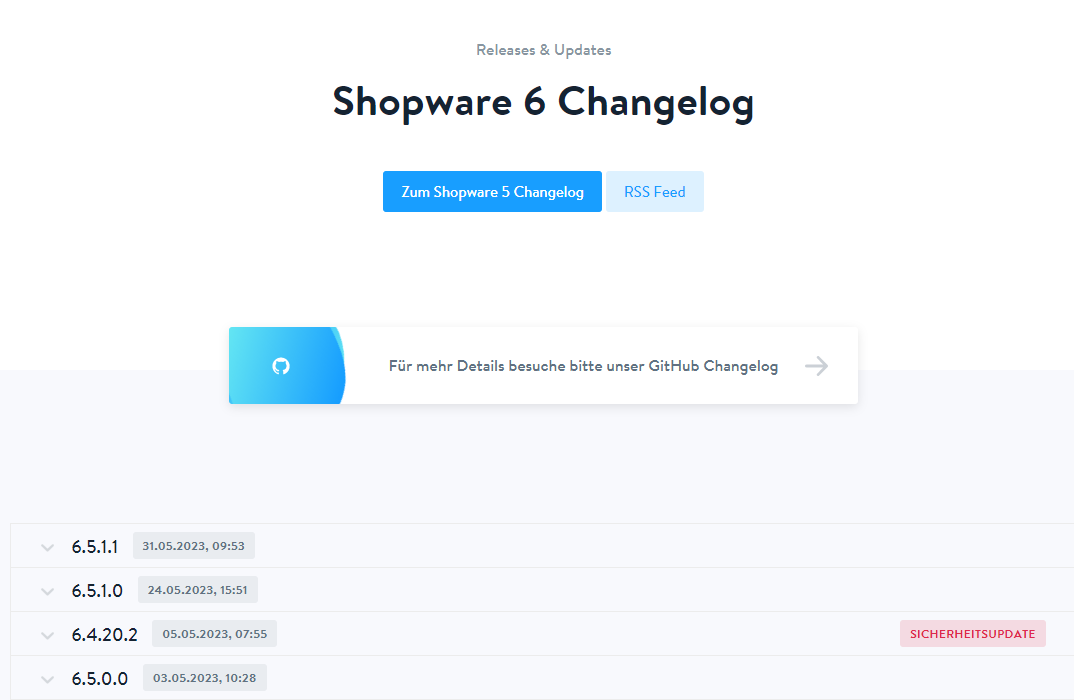
Shopware 6 changelog
A changelog contains all changes to a project and serves as important documentation of the development. It allows users to see at any time which updates have been made in a certain period of time. For Shopware users in particular, the changelog is a valuable source of information to find out which new features, bug fixes and improvements have been included in the latest updates.
By regularly updating the changelog, users can see at a glance which new functions have been integrated into the store system. This information enables store operators to exploit the full potential of Shopware and continuously develop their online stores. In addition, customization options can be identified based on the changes in the changelog, which gives store operators the opportunity to adapt their stores accordingly and meet individual requirements.
If you as a Shopware user want to understand the effects of the changes on the use of the store system, it is advisable to regularly take a look at the changelog. The Shopware 6 change log is available online on the official Shopware website and provides a comprehensive overview of all updates made. Here you will find detailed information on new features, fixed bugs and improvements made.
The changelog is also still available online for Shopware 5 users. This allows store owners who are still on Shopware 5 to keep track of their systems and ensure they are aware of the latest updates.
It is advisable to use a test environment to check changes in a safe environment before applying them to a live store. This way you can ensure that the changes work smoothly and do not have any unwanted effects on the functionality of your store.
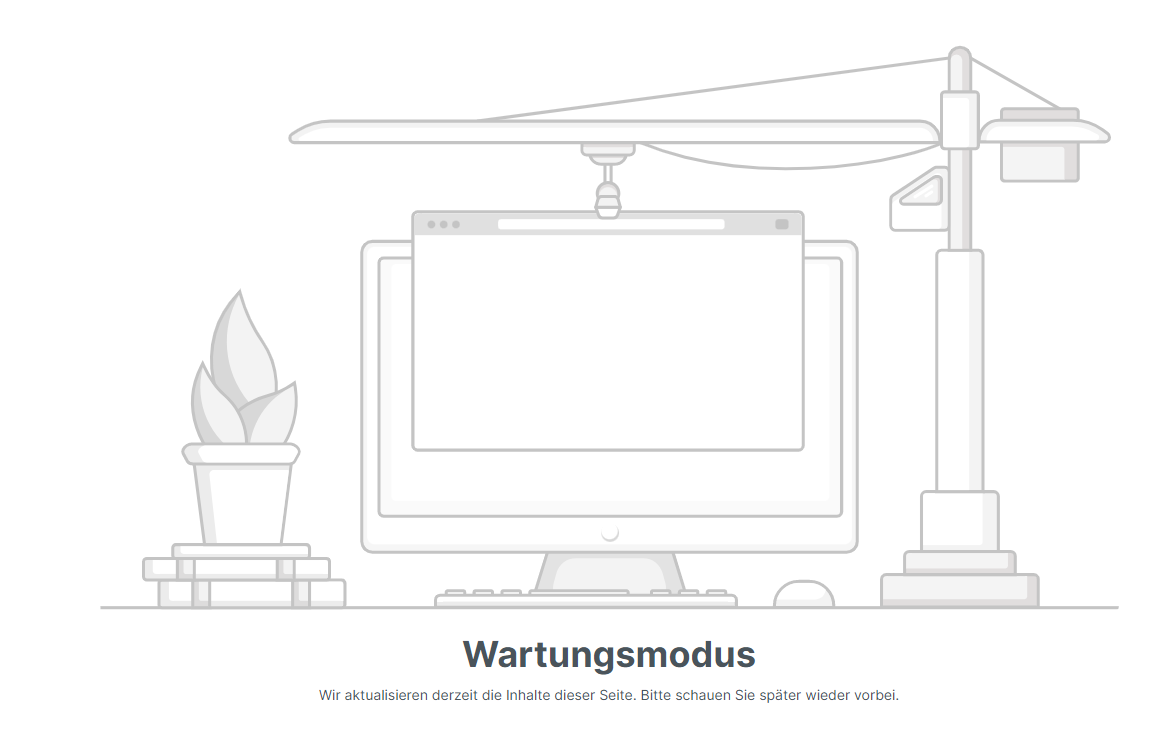
Shopware 6 maintenance mode
The maintenance mode in Shopware 6 is a useful tool for you when you are working on your live store. It allows you to ensure the user-friendliness and availability of your online store. With maintenance mode, you can deactivate areas of your store to make the changes and ensure that this does not affect the operation of your online store. For example, you can add a maintenance page or set a message to your customers explaining the maintenance work and when the website will be available again as normal.
How to activate maintenance mode in Shopware 5:
- Call up the basic settings via Settings.
- Then go to Maintenance settings via System and activate the maintenance mode.
- That's it, unless you want to edit the text individually. Then go to Settings again and then to Text modules. Search for "Maintenance" to find and edit the relevant text modules.
- Then clear the store cache so that the new text is also displayed.
Activation of the maintenance mode in Shopware 6:
- First select the sales channel that is affected by the maintenance work.
- A new window will then open. There you will find "Status" further down.
- Here you have the option of activating maintenance mode. Then save your new settings.
- So that you can still reach your store and do not receive the maintenance mode message yourself, you can enter your current IP address in the "Whitelist" field and then save it.
Shopware 6 licenses
Shopware 6 licenses are available in three different options. These are different packages with different features and prices. You have the choice between Rise, Evolve and Beyond if you want to run a Shopware store. The license for the Rise package is available from 600 euros per month and allows you to operate an online store that is aimed more at B2C business. Evolve and Beyond offer more options and are also suitable for B2B business. You also get better support from Shopware itself. The prices are not public, but are determined individually.
With all Shopware 6 licenses, you have the choice of using your store in the form of SaaS, PaaS or self-hosted.
Shopware 6 frontend
The frontend of your Shopware 6 store is a template that you can define and change yourself. You can find out more under the heading "Shopware 6 template".
Shopware 6 backend
In contrast to the Shopware 5 backend, the Shopware 6 backend has a new, tidy design. Here you can use the Shopware 6 Rule Builder to create individual rules without the need for programming knowledge. You can add various "and/or" conditions to achieve the desired result for you.
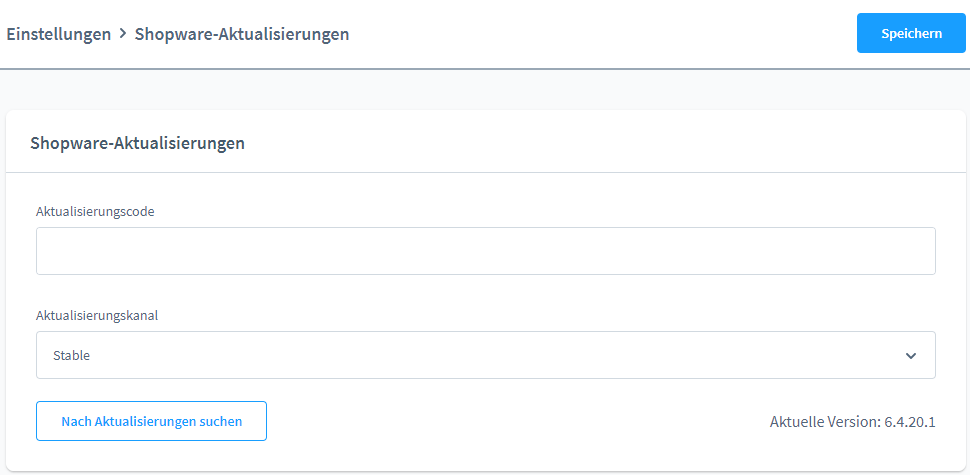
Shopware 6 updates
The developers of Shopware 6 regularly update the store system to fix bugs and add new functions. You can read about these updates on the Shopware blog or in the Shopware 6 changelog.
If an update is necessary for your store, you will receive a notification when you log into your store. You can then open the update directly here and can also see which plugins are compatible with the latest update. If everything is ready for the update, you can start it. After a few minutes the update is installed and you have to warm up data, but here you will also be carried out directly by Shopware.
Shopware 6 Themes
With the themes in Shopware 6, you can design the user interface of your online store. You can choose from various themes to help you create a good user experience and present your brand or company in the right way. A theme usually contains various design elements that you can customize. In the administration of your store, you will find the "Themes" item under "Content" and can see here which themes you can use. In the Shopware Store, you have the option of purchasing and installing additional store themes.
In the video you will get more information about themes, but also about extensions and apps for your Shopware Store.

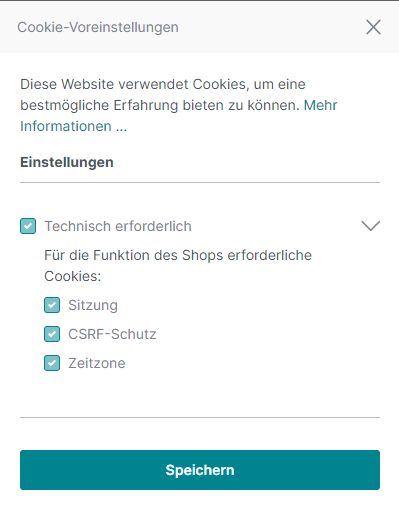
Shopware 6 cookie settings
The cookie notice that you can set with Shopware 6 complies with the ECJ ruling. Since then, there has been an active user consent requirement for the processing of data. When visiting a page for the first time, the user must be asked whether they agree to the processing. With the core update to Shopware 6, your online store should be legally compliant without you having to make any changes. To be absolutely sure of the legal situation, you should seek legal advice. As we are not authorized to do so.
Further information on the GDPR and the storage of personal data in Shopware can also be found in Shopware docs.
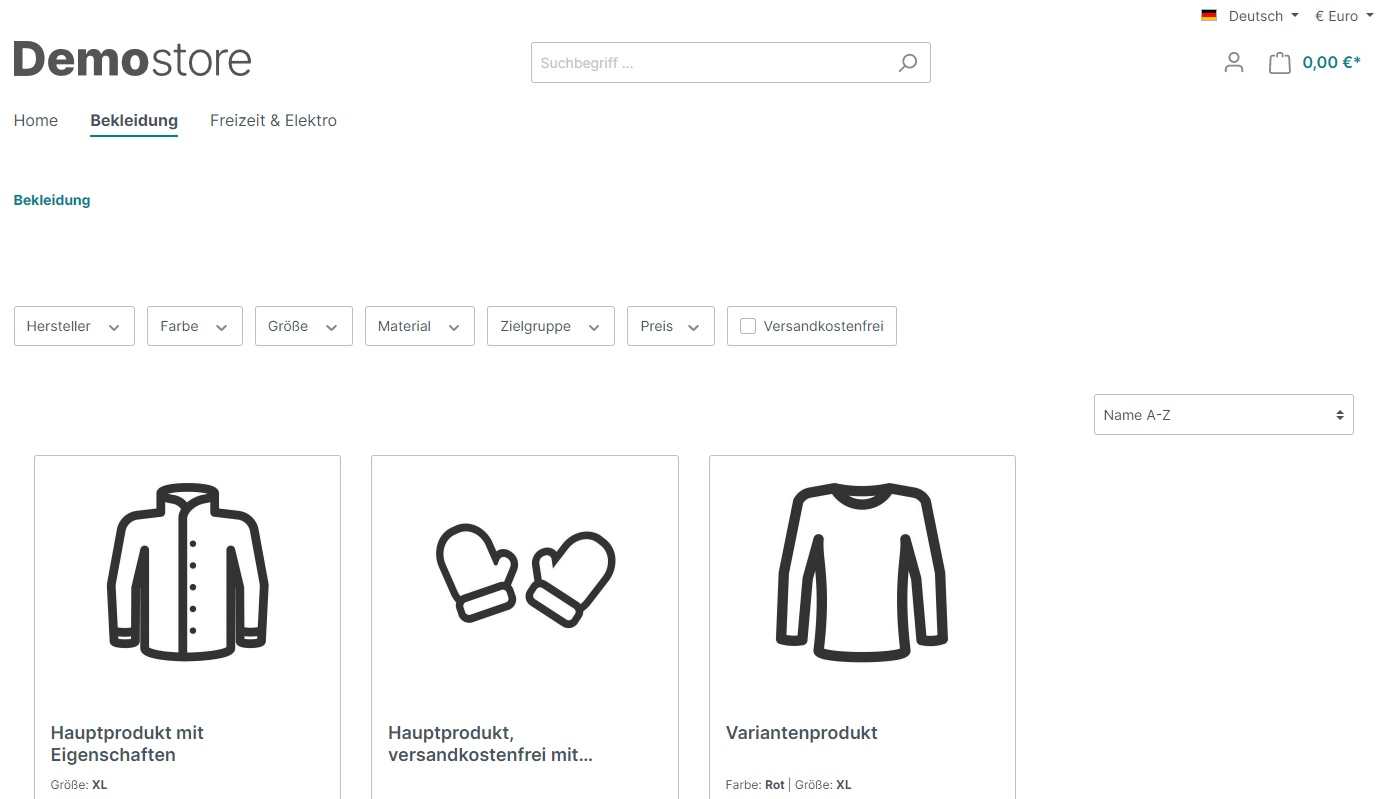
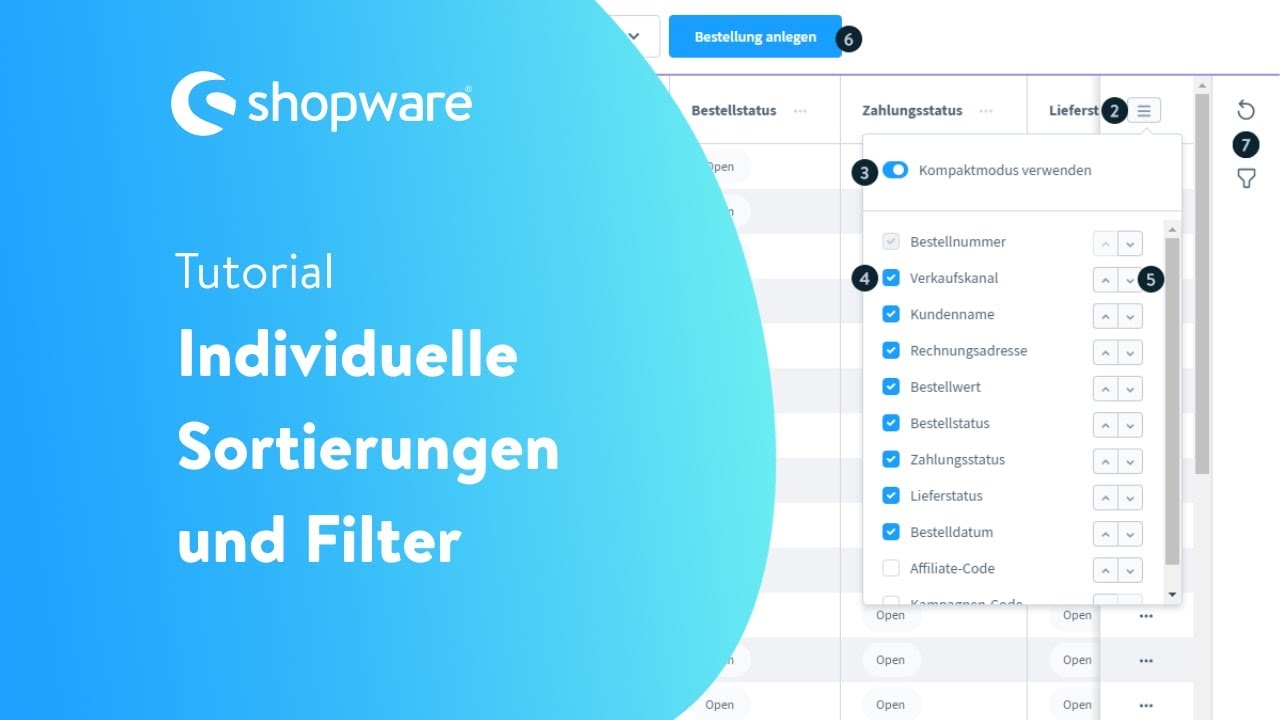
Shopware 6 filter
With the filter in Shopware 6, your customers can find the products they are looking for more quickly. They can use it to search for specific product features. Depending on the products you offer, different filter options make sense. With clothing, for example, customers should be able to filter by color and size, perhaps also by material or brand. In order for the products to be found, you must of course also store your products with the various properties in the backend. You can access "Properties" via "Catalogs". There you will see a list with all your properties and the specified property values and whether these are displayed in the product filter.
You can also watch the video here to see how you can create your own sorting and various filters:
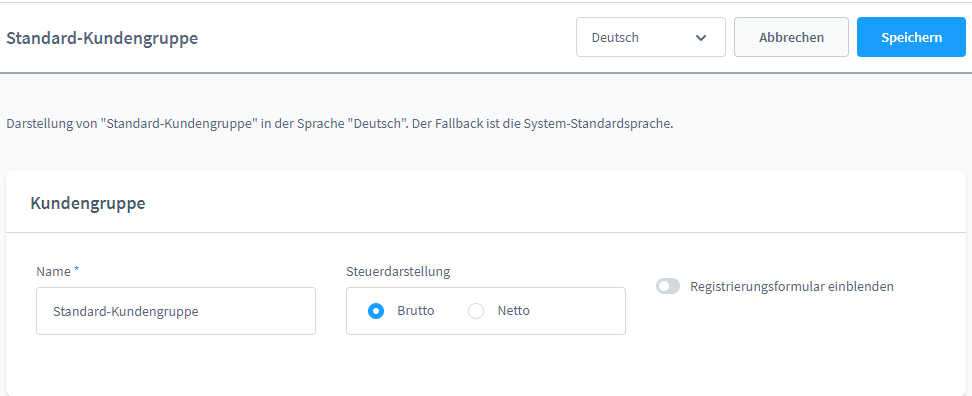
Shopware customer groups
You can create and edit different customer groups in Shopware. For example, you can enter the prices for business customers directly in net and the prices for "normal" customers in gross. Under "Settings" you will also find the menu item "Customer groups" where you can create a new customer group or edit the existing groups.
Shopware minimum quantity surcharge
In Shopware 5, you can set a minimum quantity surcharge if you want to set a minimum order value for your online store. Go to "Customer groups" via the backend and basic settings. There you select the desired customer group, such as "Shop customers", and can edit it. Here you have the option to select a minimum order value and a surcharge for orders. This is then the minimum quantity surcharge. This means that for every customer who does not reach the minimum order value, the minimum quantity surcharge you have defined will be added. This function is no longer available in Shopware 6. You must either buy and install a plugin from the Shopware Store or create your own rules using the Rule Builder to replace this function. We will be happy to assist you and help you create a minimum order value with a minimum quantity surcharge.
Shopware premium items
For Shopware 5, you can create your own reward items to reward your customers. To do this, you must fulfill two requirements: Firstly, you must assign the product to a category and then activate the setting for displaying reward items. You can find this setting option under Storefront and then Order completion. Then go to Marketing in your Shopware 5 store and select "Reward items". Here you can then enter and save all the details (order number, minimum order value, export order number, store, etc.). A reward item has already been created for your customers.
There is no direct setting option for this in Shopware 6. However, there are now some plugins in the Shopware Store that make it possible to create bonus items.
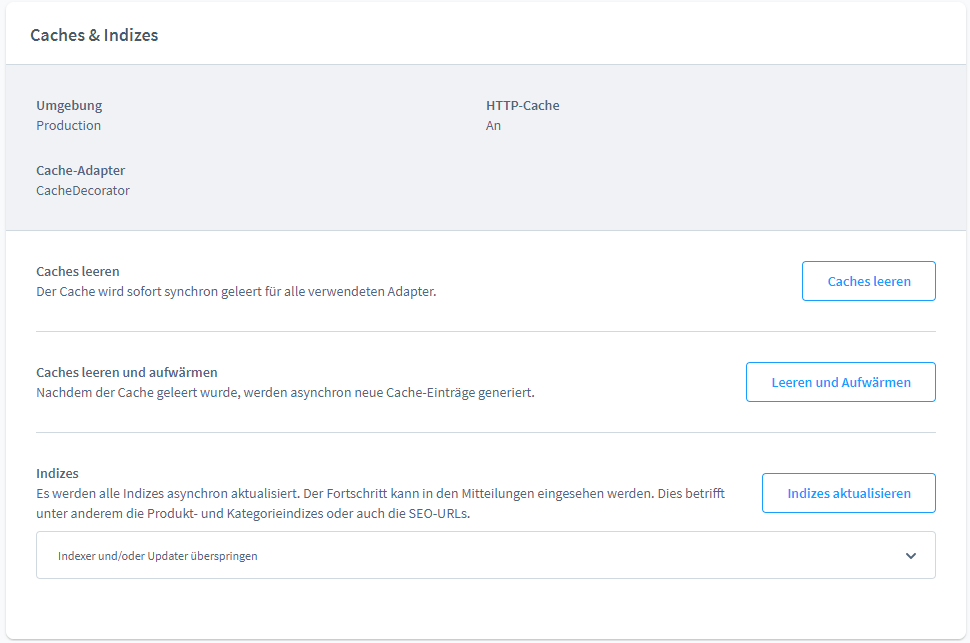
Shopware 6 cache
You can easily empty your Shopware 6 cache by going to "System" and then "Cache & Indexes" in the settings. There you will find the button "Empty caches", with which you can empty all existing caches, for example to be able to see changes to the frontend. There is also the option to delete and reheat caches. This also allows you to clear all caches, but also rebuild them to make your store faster. You can also update the indices here to generate SEO URLs for your store, among other things.
Shopware 6 API / API-first approach
Shopware 6 follows the API-first approach. An AI is the application programming interface, i.e. the control center for data exchange. Shopware 6 now makes it possible for data from a wide range of applications to be exchanged and used for your store and your success in e-commerce. Data exchange is possible with Instagram, Twitter and Google Maps, for example. You can also use a completely different frontend in Shopware 6 with the Shopware 6 admin area and use your own store design.
Shopware dynamic product groups
You can create so-called "dynamic product groups" for your Shopware store by defining various rules in the backend to group your products. The products that fulfill the defined conditions are then displayed in the places you specify in your store. This allows you to categorize the products.
You can findmore information about dynamic product groups in our detailed article.

Shopware shopping worlds
You can find the shopping worlds in Shopware 5. Shopware experience worlds were introduced as a successor for Shopware 6. The shopping worlds are designed to help you improve your customers' shopping experience. A shopping world can be set up via the Shopware 5 backend to create category and product pages with a special design. Responsiveness also plays a major role here. This allows you to easily create landing pages, product presentations and marketing campaigns that your customers will remember.
Shopware 6 worlds of experience
The Shopware 6 Shopping Experiences are the new counterpart to the Shopware 5 Shopping Experiences and focus entirely on the emotional shopping experience of customers. This makes it easy to create individual store pages. Storytelling and addressing the different phases of the customer journey are possible with the Shopping Experiences. This also gives you the opportunity to explain more about your company, manufacturing processes, sustainability and so on to your customers and accompany them visually. It is now also possible to respond specifically to the target groups by personalizing the approach. All content can also be internationalized. By using the Shopware 6 worlds of experience, you can make yourself and your company stand out and improve your customers' experience.
Shopware guest order
Guest ordering is a good option for new customers to complete a purchase quickly without having to create an account. This allows you to increase your conversion rate.
The standard installation of Shopware includes the option to offer a guest order. You can define further settings for guest orders in your store in the backend under Basic settings. Under Storefront and Login/Registration you can find the setting option "Do not deactivate customer account". "No: option is not preselected" will probably still be stored here. However, you also have the option of selecting "Yes" to deactivate the guest order. With the default setting "No: Option is not preselected" you offer your customers the guest order, but they still have to select the option themselves before purchasing. Your last setting option is "No: Option is preselected". Then the guest order is on and the checkbox for the guest order is already preset.

Shopware 6 newsletter
If you use Shopware 6 for your online store, you can also send newsletters. However, this is not simply possible from within Shopware. You need a so-called newsletter recipient module. This allows you to simply transfer the recipients of the newsletter via an interface. This procedure allows you to decide for yourself which tool you want to use to send your newsletter.
You can find the right extensions for this in the Shopware Store. For example, there is the Mailchimp newsletter configuration or the extension from rapidmail.
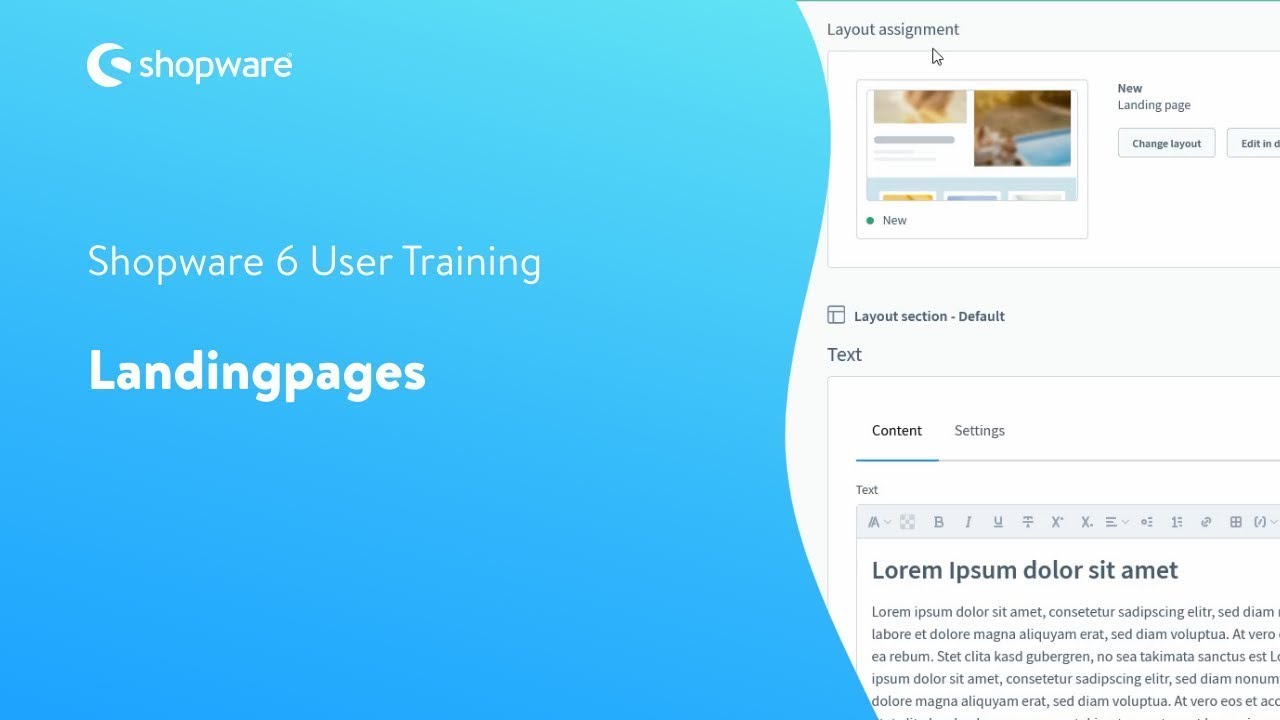
Shopware landing page
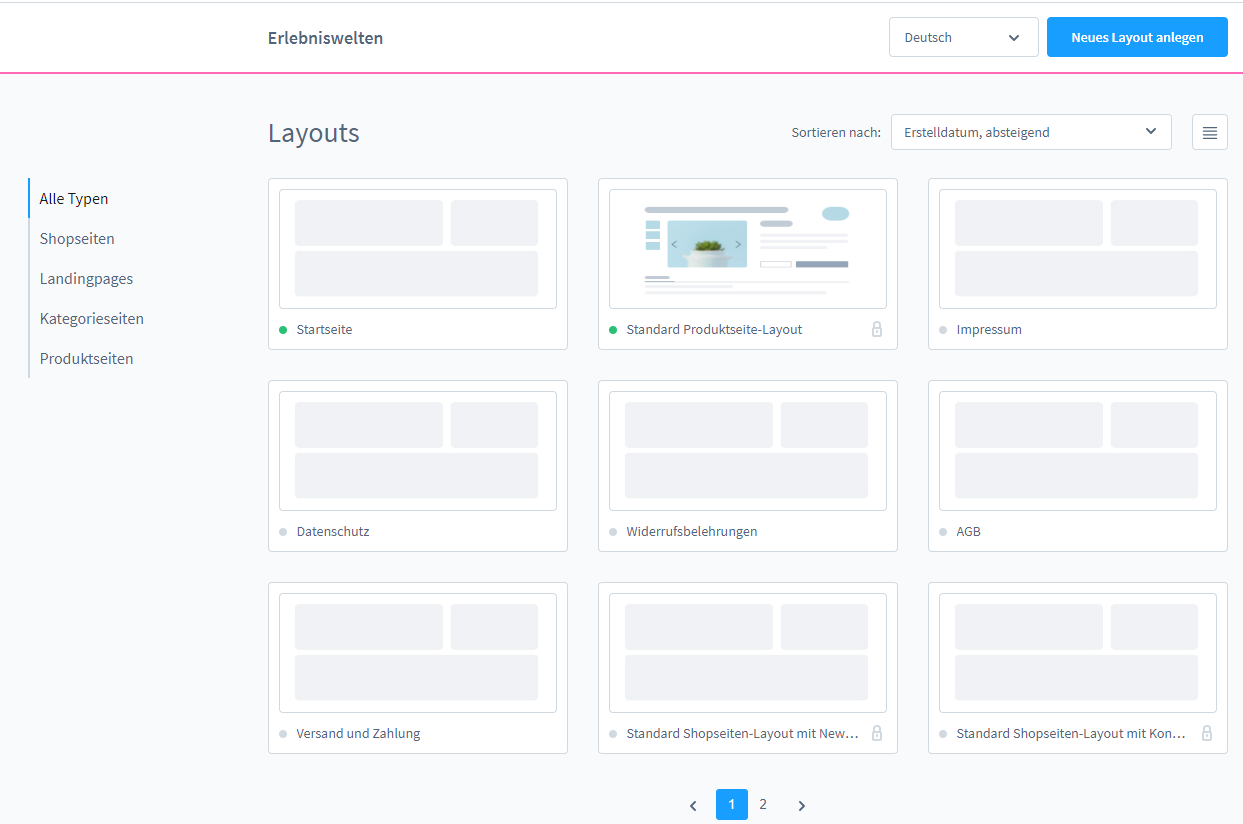
Landing pages are specially created pages that appear after clicking on an advertisement or in the search results of a search engine. They cannot be found via the normal navigation of a website. In Shopware, you can also create landing pages for advertising purposes that do not appear in your online store. And this is how it works in Shopware 6:
First, you need to create a new experience for your landing page. You can do this in the administration under Content. Then click on Experience worlds. Then you have to answer the questions about what type of website you want to create. Here you can directly select Landingpage and design it as you wish. To make the landing page with the experience world available, you have to add the landing page in the administration under Catalogs. To do this, you need to make further settings and can also implement your SEO directly.
You can find more details about landing pages in Shopware 6 in this video:
Shopware Topseller
In Shopware 5, it was possible to integrate top sellers directly into your online store via Shopware. In Shopware 6, you can now do this via extensions that you can find in the Shopware Store. With these extensions you can, among other things, integrate a product slider into your world of experience with the top sellers of your store. Filtering and sorting by top sellers is also possible. The top sellers are always recalculated with caches & indices. Here you can find the top seller extensions for your online store with Shopware.
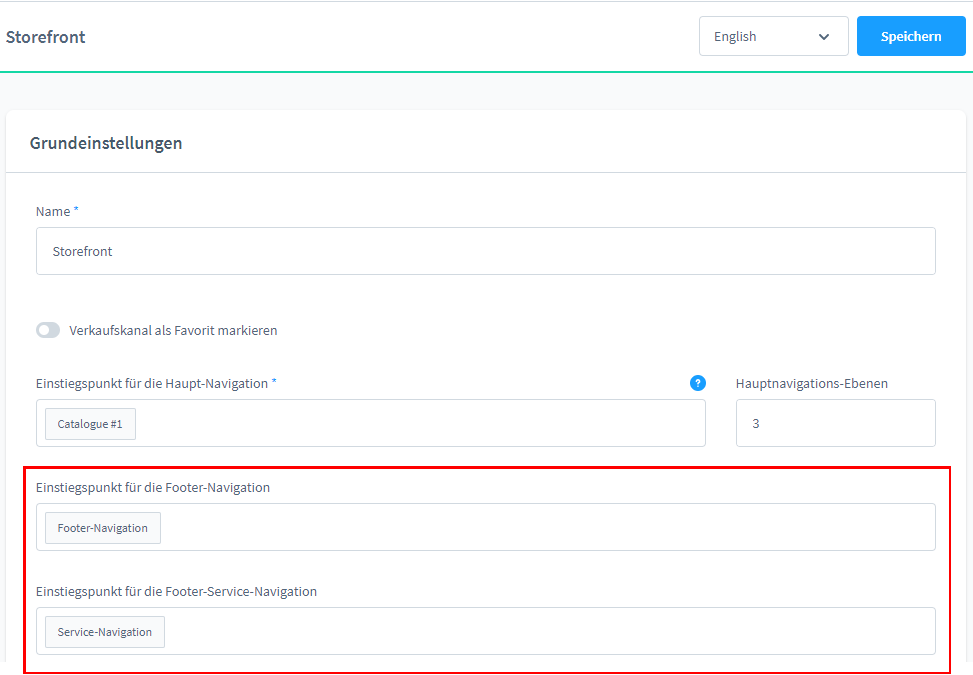
Shopware 6 Footer
When you install Shopware, important pages such as terms and conditions and data protection have not yet been created. You still need to set these up in your footer. You can use the categories to create which pages you want to set up in the menu or footer. Each individual item then represents its own category.
In the administration under Categories, you can then create the Footer category and activate it. In the next step, go back to your sales channel that should contain this category and you can then select the new "Footer" category under Basic settings and "Entry point for footer navigation". In the categories, you can then create further subcategories for the main category "Footer", such as "About us", but also "Information" such as "Terms and conditions", "Imprint" and "Privacy policy". You should then activate these as well.
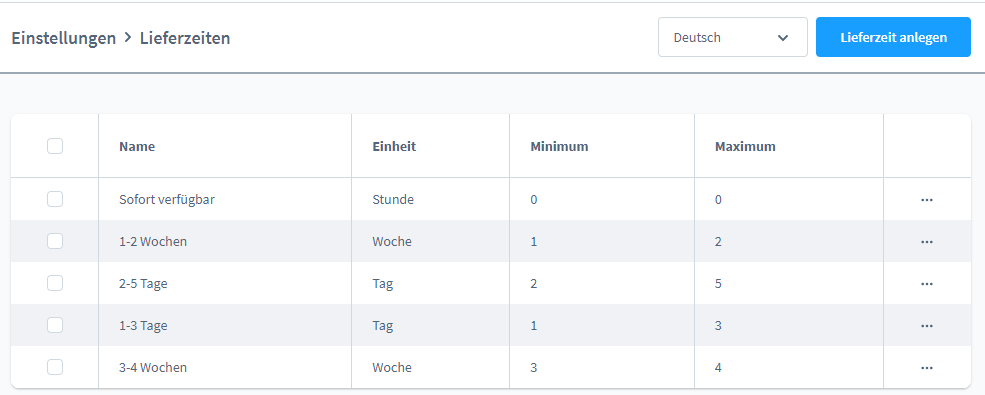
Shopware delivery time
So that your customers know when they can expect their ordered goods, you can set information on the delivery times for your products using the delivery times function. You can easily find this under "Settings" and then "Shop". You can then enter your details here. Once you have created your delivery times, you can always set your delivery times for each product in the product information under "Availability". Customers will then see this information on the product detail page and are well informed.
You can also display the delivery times to your customers in the shopping cart if you wish. Activate this function via "Settings", "Shop" and then "Shopping cart".
Shopware support with EXWE
We hope that these explanations of common Shopware terms and functions have helped you to set up your store the way you want it. If you have Shopware terms that we have not yet explained, you can either find more Shopware articles in our blog or contact us by phone or via the contact form. We will be happy to help you with all your questions about Shopware. Do you need support with the creation, administration or redesign of your online store? As a Shopware agency, we are also your best contact here.
Was ist dein Projekt? Wenn du uns darüber erzählen möchtest, rufen wir dich zurück!

Hello, my name is Meike. I take care of the EXWE back office and am responsible for our social media channels. All of our articles are meant to make your life easier and help you make decisions. Nevertheless, it can happen that something remains unclear, so: If you have questions about this article you can easily reach me at +49 231 93149827.
Here are ten good PayPal alternatives for your online store: Easy-to-integrate payment methods for fast payment processing for your customers.
Learn how to create a successful Shopify store step by step and launch your own online shop with confidence. Our comprehensive guide walks you through the process, empowering you to build a thriving e-commerce business from scratch.
What is a headless content management system? Here you will find all the information, advantages and challenges as well as an introduction to various systems!